I'm trying to use my MK5 and need to calibrate Skeinforge. But how can I do that if the motor always stop in the middle of the print and restart by itself ? That append many times in the print. Doesn't look to be the board since the LED turn on when it should. It's a new motor with the little electronic board inside. I think I will try with my old motor from MK4 (one without the board inside) to be sure if it's the motor or something else...
Maybe I will have a week of printing without any issues...... someday...
Sunday, October 31, 2010
Friday, October 22, 2010
Makerbot #453 : Homing in place
Last night I took some time to make my Start and End script for Skeinforge so I will not have to recenter my plastruder each time.
First, I was using G0 X100 Y100 to push the build plate at the end but I found that it took some time after reaching the endstop before doing the next steps. It took Much much longer time also with the G0 Z-50. It took about 2 minutes before doing next commands.
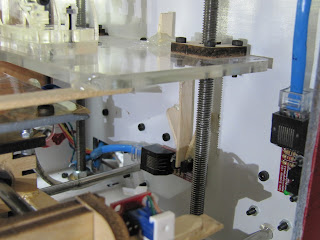
I found that G28 works better. No waiting time when reaching the endstop. I had to make some modification to my Z endstop triggers. I know it's not looking really good but it works. Next time I will make one in ABS with the possibility to adjust it.
First, I was using G0 X100 Y100 to push the build plate at the end but I found that it took some time after reaching the endstop before doing the next steps. It took Much much longer time also with the G0 Z-50. It took about 2 minutes before doing next commands.
I found that G28 works better. No waiting time when reaching the endstop. I had to make some modification to my Z endstop triggers. I know it's not looking really good but it works. Next time I will make one in ABS with the possibility to adjust it.
(beginning of start.txt)
M104 S220 T0 (Extruder Temperature to 220 Celsius)
M109 S100 T0 (Heated Platform Temperature to 110 Celsius)
M107 (fan off)
G21 (Metric FTW)
G90 (Absolute Positioning)
G92 X0 Y0 Z0 (You are now at 0,0,0)
G0 Z5 ( Go higher to be safe)
G28 X0 Y0 ;go home ( XY at the MAX)
G28 Z0 ( Go down with Z)
G92 X0 Y0 Z0 (You are now at 0,0,0)
G0 Z1.5 (Higher a little bit to clear the place)
M6 T0 (Wait for tool to heat up)
G0 X57.5 Y45 (Put the build plate in the center)
G0 Z-1.5 (return to the base)
G92 X0 Y0 Z0 (You are now at 0,0,0)
(end of start.txt)
(beginning of end.txt)
(end of the file, cooldown routines)
M104 S0 T0 (temp zero)
M109 S0 T0 (platform off)
M106 (fan on)
G21
G92 Z0 (zero our z axis - hack b/c skeinforge mangles gcodes in end.txt)
G91
G0 X100 Y100 Z20 (
M18 (turn off steppers.)
G04 P120000
M107 (fan off)
(end of end.txt)

Makerbot #453 : MK5 working !!
My bot is now working with my MK5 installed. Doesn't took me too much time to build and it works right on the first time. OK, some adjustments need to be done but i was able to print a 15MM cube and a whistle :-)
I also updated firmwares with latest one from ReplicatorG 20 and for the first time I was able to print raftless without any adjustment. It was not perfect but far better than before.


I also updated firmwares with latest one from ReplicatorG 20 and for the first time I was able to print raftless without any adjustment. It was not perfect but far better than before.


Monday, October 18, 2010
Makerbot #453 : MK5 on my desk !
YES !! Just received my MK5 kit. Should start to look at that tonight. Hope to make my Bot working soon, before the 1 year anniversary ;-)
This will be a big test compare to my last use : New Plastruder, New ReplicatorG, New Skeinforge.
If all go well , I plan to buy the ABP. I wanted to take it at the same time of buying my MK5 to save on shipping but I need to be sure I will be able to print correctly before any other big ($$) addition to my Bot.
Wednesday, October 6, 2010
Makerbot #453 : Waiting for my Plastruder MK5
It's so hard to calibrate everything on the cupcake :-(
I don't have enough time in my life to spend on calibration. I so hope for a process to calibrate the machine. Meanwhile, I will try with the new MK5 from Makerbot . I hope This will help me to start printing more then just some little pieces of crap. By the time the MK5 come home, I will try to set my machine to find is 0,0,0 before each print.
.
Wednesday, August 11, 2010
Makerbot #453 : I broke my Acrylic Insulator Retainer
Last week-end I was trying the new Replicator G v18. I printed the Z cover from


MakerBot Board Covers by WRIGHT1 . Not a bad print but some noise from my Plastruder, just something like "crack". Cover Z is good so I started to print the Y cover. Unfortunately, the Retainer was binding making the head touch the print. That was the end of the retainer. By chance, I have a copy of the retainer in ABS (hope it is good).
It's now time to build and install my MakerGear HeatCore. I will also try to find a way to dissipate more heat from the insulator, that will help the retainer.


Tuesday, August 10, 2010
Makerbot #453 : RepG 18 And Temperature.
I was trying the Rep G v18 and wanted to make some adjustment. I changed the thermistor table values to make some test but I didn't took note of originals values ( This is what append when you work in the night).
Now I have strange behavior : When I set the Temp to 200C, the reported temperature stop at 190C (always 5 to 10C under what it is set). That make impossible to print since the script wait for the correct setting. The only way t o make it working is to set the temp. to 10C more than required. This give me enough time to start the print before temp go down under required setting.
I will try to find originals values and will do more tests.
Thursday, July 22, 2010
Makerbot #453 : What should be done to help us is...
Since the beginning, I had many problems with my printer. It's ok, I like to debug and correct problems.
What I think is harder is to make the calibration. If only I had more time to read all possible settings of Skeinforge and try all of them to know exactly what they do... But it's not the case.
Why not having a couple of test pattern related to some important settings to help us doing it right ?
Like with a inkjet printer where you print a sheet and you need to tell the printer which line is the best one.
For the 3D printer maybe a couple of simple print with a small guide that tell you if you need to change a couple of values in skeinforge. " If part #2 look like this, put a smaller value for setting X".
Yes that will took Us to print many time the same test pattern to have a fully calibrated printer, but it will help to not loose our head in all the settings.
Also, when the printer is calibrated, why not having in RepG a pop Up asking what type of printing we want ?
Again, like with a inkjet printer.
- Draft, Medium, High Quality,
- Infill Full or just a little...
Ok, maybe i'm dreaming....
WAIT ! A couple of years ago, i was dreaming of printing ABS :-)
Tuesday, July 20, 2010
Makerbot #453 : Hard to print Small parts
I have so many problem when i'm trying to print small parts. :-(
I had to print a square of 12 X 17 X 2 mm with a design cuts inside. That make a 2 mm between the side and the hole. Gush, it was not a big success. I printed something better with a 1.5X bigger version.
Need to put time on Calibration :-(
I had to print a square of 12 X 17 X 2 mm with a design cuts inside. That make a 2 mm between the side and the hole. Gush, it was not a big success. I printed something better with a 1.5X bigger version.
Need to put time on Calibration :-(
Sunday, May 2, 2010
Makerbot #453 : Ceramic Heated Build Platform (HBP) part #2
To connect the thermistor, I bought a temperature sensor.

I found 2 problemes with it.
First : the connector are not correct for the A6 connector on the plastruder. The VCC and the 5V. need to be switch. After cutting the trace I placed a small wire to make it right.

Second problem : The green connector on the Temperature sensor board is too big and crash on the casing when going UP. So I decided to not connect it directly on the plastruder board. Because of that, the bad wiring are no more a problem since I'm using a wire. With the wires I can connect it where I want. Anyway, the switch is already done.... Note to me : Next time, look if a new part can be place safely where you need it.
To drive the HBP I'm using a Relay. I installed a LED (took from a old Network touter ) to see when it's heating or not.


The relay is placed with the sensor board on the right side of the Makerbot.

This is the connection on the plastruder :

The test show that it's now easy to reach 100C in less than 10 minutes.

Now, I need to find a good cable to connect all of that to the HBP. I need something long enough and also a cable that can move with the HBP.
Thursday, April 29, 2010
Makerbot #453 : Ceramic Heated Build Platform (HBP) part #1
I started building my HBP. I have the V. 1.0 and will try to build it like a V.1.1.
Nichrome = 4 ohms.

Nichrome = 4 ohms.


Wednesday, April 28, 2010
Makerbot #453 : Back on track !
After weeks without using my printer, i'm back !
I started to print a mini-mendel ( Mini-Mendel Production Files by cyrozap) and it look good. I only printed the first sheet for now. It took about 80 minutes. I only have a small curve because the acrylic bent a little bit. I will post picture tonight...
My next step is to build my Heated bed. I will test it with the next Mendel parts.
I Also have to correct 2 littles problem on my bot : Z rods wobbling and X-Y vibrations.
I will take care of the vibration when modifying the build plate.
Wednesday, March 24, 2010
Makerbot #453 : Heated platform received !
Good news, I received my Makergear package.
Look great.
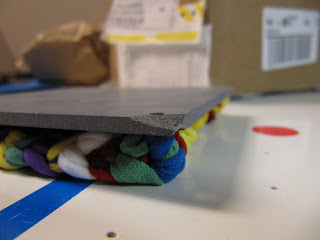
Only one little thing.... a corner of the ceramic plate is broken :-(
It will not be a problem for printing since it's near the screw hole, But I like to be the one that broke my stuff ;-)
Also USPS charge me 5$ for handling fee. Next time I will take a shipping that include ALL possible fees.
Ok, end of frustration.
As you can see, I have now something to do next week-end.


Look great.
Only one little thing.... a corner of the ceramic plate is broken :-(
It will not be a problem for printing since it's near the screw hole, But I like to be the one that broke my stuff ;-)
Also USPS charge me 5$ for handling fee. Next time I will take a shipping that include ALL possible fees.
Ok, end of frustration.
As you can see, I have now something to do next week-end.


Monday, March 22, 2010
Makerbot #453 : Filament dust remover
Since ABS like to capture dust, I was looking for a solution. Didn't had to make it myself, i found one on thingiverse :-)
Filament Dust Remover by CidVilas
Ok, It have some ABS blob on it....I really need to calibrate my printer. Need to take some time to learn Skeinforge settings...
 |
| My Dust remover print |
No more UPS Standard from USA...
If you are in Canada like me and want to buy some stuff from USA, think it twice before you choose UPS. At least, pay more if you want to pay less...
Ok strange....
The fact is I bought parts in USA and had the choice of 2 types of UPS shipment. Since I was not hurry to receive it I took the less expensive. Bad decision. Instead of paying 10$ more for the shipping, UPS charged me 37$.for brokerage fee. They told me that the brokerage is include If I had pay 10$ more... Who on earth will not pay 10$ if you save 37$ after ?? Please let us know BEFORE.
So for a 75 $US shipment I have to pay 43$ (including Canada taxes). This is the price I had to pay when I received My makerbot ...but for a 1000$ value.
Thanks for the site where I take parts, they will no more use UPS standard for Canada.
Friday, March 5, 2010
Makerbot #453 : My Skeinforge settings
I'm working to make my Makerbot working with the latest Skeinforge.(I used the version from Skeinfox : 2010-02-12)
I need to calibrate some settings but I'm now able to print with it.
I need to calibrate some settings but I'm now able to print with it.
You can look at it if you want and make comments.
The Profile in Skeinforge let you test multiple settings without having to change the one that works.
To test it, simply copy the folder in your .skeinforge\profiles\extrusion\
I have to find why the bed turn around before printing the raft....
Next step : Calibrate, change start code to be bale to place the head somewhere else than on the Acrylic plate (not good when the nozzle is HOT).
Wednesday, March 3, 2010
MAkerbot #453 : Insulator Leaking


Today I had to make many prototype printing. This mean design, heat printer, print. Repeat as many times as needed. The nozzle cool down very fast, but not the PTFE. At the end of the Day, it start to leak. The bottom is bigger than before. and I was unable to print because too much ABS go in the PTFE and the printer cannot melt it again.
I had to disassemble the Heater. Doing that, i broke my thermistor :-(
I installed a copper tube on the PTFE to help not blowing anymore. The problem is that copper take all the heat. To help dissipating that heat, I added 2 small heatsink on it. Hope this will help.


Saturday, February 27, 2010
Makerbot #453 : Now with lights
I had an old LED flashlight that doesn't work well. The button and the battery holder was broken. I took the LED part and connect it directly on the plastruder board. Now, even in the dark I can see my bot printing :-)


Thursday, February 25, 2010
Makerbot #453 : Heated Platform on it's way
I just bought some parts for my printer. It should help because I have some problem trying to make ABS stick on the base.
- Ceramic Heated Platform Kit
- Adhesive Temperature Indicator Strip ( 2 models)
- Thermistor plus Temperature Sensor Kit
All from MakerGear
They should ship it next week...
- Ceramic Heated Platform Kit
- Adhesive Temperature Indicator Strip ( 2 models)
- Thermistor plus Temperature Sensor Kit
All from MakerGear
They should ship it next week...
Makerbot #453 : Now working...for real..
I received my new Mainboard and a new extruder board.
Now, RepG show me the temp. of the nozzle.
When printing, the process don't stop at each 3 seconds.
Now I can make adjustment to make it working better.
Ok, It's like I lost the last 2 months for the bad boards but at least I learn a lot ;-)
Now, RepG show me the temp. of the nozzle.
When printing, the process don't stop at each 3 seconds.
Now I can make adjustment to make it working better.
Ok, It's like I lost the last 2 months for the bad boards but at least I learn a lot ;-)
Saturday, February 6, 2010
Makerbot #453 : Good news !!!
With all my frustration, I decided to write to Bre Pettis to see if they can make something for me, like sending me another board.
I get a response from Adams telling me that they will send me a new board.
Haaaaa....soooo happy !!!
I get a response from Adams telling me that they will send me a new board.
Haaaaa....soooo happy !!!
Makerbot #453: what was done
This is a list of things that I did in hope to resolve my makerbot problems.
- no bootloader on sanguino. Push it in bitbang mode
- firmware 1.6 on both boards.
- no rj45 connected when loading firmware on plastruder
- thermistor working well, I even changed it to be sure
- changed the rj45 cable ( cat5, cat5e , cat6)
- connected the power supply on a booster pack to eliminate AC noise
- 3 differents power supply
- all lights closed to remove possible noise from fluo
- heat all solder points to make sure there's no cold soldering
- add the R180ohms on both boards for the communication
- upload firmware : 1.5, 1.6, 1.7, 1.8
- 3 different OS on 3 different PC : win 2000. Win XP, win 7
-
Makerbot #453 : another night of frustration
I spent another 4 hours trying to resolve my communication error with my plastruder.
I cannot find any more solution to try.
I realy think it's the hardware that make that.
I installed the firmware v. 1.8 and connect a new thermistor for the build plateforme
and I cannot see it in repG like the other one. Also, when seting to 60C the LED
on the board dosen't light up.
I Installed RS486_tester from the gen3 firmware package on the master and the plastruder.
Connecting the USB cable on the plastruder show me that it was sending data.
When connected on the master it show that t wait for a response that never append.
I also try to update to firmware 1.8 from repG 10 since someone told that repG12 can make problem.
Nothing new. Always the payload error and the no firmware version in repG.
Can it be the bootloader on the board ?
Can it be because I pushed the bootloader on the sanguino in bitbang mode ?
Saturday, January 30, 2010
Makerbot #453 : Test on video....
This is a video of my Makerbot printing a 15mm cube.
It take 3 try before it realy start (first 2, the extrusion stoped at the begining).
Ok, I had a problem with the raft but that dosen't change the way it works.
When carefully looking the process, I see that it pass 2 times at the same place before changing the Z.
Also, as you can see, it stop in the corner, stop the motor, restart it with a big splash of ABS before continuing the printing....


Thursday, January 28, 2010
Makerbot #453 : again.....
No success :-(
I never did a single full part with it ...
The new RepG 12 show me an error at start up :
Maybe this show that the board is realy defect....
Will try to contact Makerbot Industries to see if they can change it.....
I never did a single full part with it ...
The new RepG 12 show me an error at start up :
Reset.
Motherboard firmware v1.6
Error: payload not big enough.
Error: payload not big enough.
Extruder board: Null version reported!
Ready to print.
Maybe this show that the board is realy defect....
Will try to contact Makerbot Industries to see if they can change it.....
Tuesday, January 26, 2010
Makerbot #453 : It Print !!!!
Wow, what a great feeling !
OK, I have some adjustments to do but it works.
I wasn't able to print a full Z-Crank since the layers where "bumpy" and the head knock on it.
Next step : adjust the build area to be more on level.


OK, I have some adjustments to do but it works.
I wasn't able to print a full Z-Crank since the layers where "bumpy" and the head knock on it.
Next step : adjust the build area to be more on level.


Makerbot #453 : maybe that can help
OK, I will now check all contacts and re-solder it.
Also, To make the Makerbot working I jumped the power supply pins since the 10k resistor didn't works. Now I change that to a 47 ohms resistor.


Also, To make the Makerbot working I jumped the power supply pins since the 10k resistor didn't works. Now I change that to a 47 ohms resistor.


Monday, January 25, 2010
Makerbot #453 : dreaming of a good printing...
Again, I'm not able to print :-(
I resolved my last problem of the raft not sticking on the base. It was caused by the thermistor table not changed when updating the firmware from RepG. I pushed the firmware with the table from Arduino and it look better now.
Now I really need to find why I have so much problems with my plastruder board.
- No temp. reported to RepG
- Firmware corruption (need to push firmware again)
- "Payload not big enough" error
- Heater + feed motor stopping when printing
A good news, I reduce the noise on the X axis by gluing (little bit of hot glue ) the shaft on the side of the Makerbot. That eliminates the noise when moving.
Hope to be able to print a single part....not just a small portion of it.
Saturday, January 23, 2010
Makerbot #453 : worst then ever...
I did some change to see if I can resolve the "payload" error but without success. O even try the latest version (1.7) of the plastruder firmware.
Strange but now i'm unable to print...The ABS don't stick to the base anymore.
.....
Strange but now i'm unable to print...The ABS don't stick to the base anymore.
.....
Saturday, January 16, 2010
Makerbot #453 : First Print....almost..
I rebuild my Heater from scratch. I always have the problem with the temp not showing in RepG. I started with a Print from RepG directly and it was pausing when printing.
Sending the File to the SD card from RepG took about 15 minutes so i decided to put it on the SD from My computer.
Now it's time to print !
I started with this small men ( http://www.thingiverse.com/thing:883 )
and the 15mm cube ( http://www.thingiverse.com/thing:1498 )
As you can see in pictures and videos, I have a problem : Too much ABS extruded at some place.
Also, when printing the cube, the extrusion stoped after 8 minutes but not the process. I needed to reset the Makerbot Mainboard to be able to make it working again... Strange...


Thursday, January 14, 2010
Makerbot #453 : Parts received.
Juste received My parts :
2 PTFE, 1 nozle, 5' nichrome, 1 thermistor, 1 heater barrel and High Temp Tape.
With that I'll be able to make two extruders nozles.
I think I will try to change the Acrylic retainer to something like the metal plate at the bottom...
2 PTFE, 1 nozle, 5' nichrome, 1 thermistor, 1 heater barrel and High Temp Tape.
With that I'll be able to make two extruders nozles.
I think I will try to change the Acrylic retainer to something like the metal plate at the bottom...
Monday, January 11, 2010
Makerbot #453 : Explosion of the extruder....
After cleaning and rebuilding my extruder I started a new round of test.
Since I didn't receive the M6 nut, the only way to retain the nozle is by the PTFE.
After maybe 3 minutes of extrusion, the heater barrel goes out of the PTFE :-(
Gush ! The PTFE is now full of ABS with a larger hole on the side of the barrel.
I'll need to buy another. Note to me : Find a M6 nut before next test.
Saturday, January 9, 2010
Makerbot #453 : When it go bad ....
First extrusion !!!
But after a minute the feed stoped....
The wheel was not enough pushing on the ABS.
Result : ABS burned in the head. Now it's time to remove the head...not realy a easy part. The Tape was burn around the Nichrome wire making it realy hard to remove.
When completed, Time to heat the barrel with the torch to get the ABS out.

Monday, January 4, 2010
Makerbot #453 : No temp reading in ReplicatorG
My Bot can't report the temp to the ReplicatorG software :-(
But When I set it to 50, I can see the LED turn On and Fading off when reaching the 50....
So, I think it's only a communication betweenThe soft and the controler.
ReplicatorG report a "Payload not big enough" error....
Subscribe to:
Comments (Atom)