Sunday, February 22, 2015

Solidoodle Press : Not yet ready for average users

I received my brand new Solidoodle Press !
At first, it look realy great and more professional than my old Cupcake ;-)


I like the build size (8x8), the closed chamber, the built-in light and all the promises....

As stated on the website : [...]As a true plug-and-play machine, the Press is the ideal printer for users new to 3D printing. [...] The Solidoodle Press is a one-touch 3D printer designed to fit in your home. A consumer machine with no manual calibration required to get started. Just take it out of the box and start printing]

FALSE !

Installing soliPrint software on windows is easy but not enough : Printer not detected ... Look that on Windows 8.1 you need to install the serial driver too.. Why do I need to search deep on the website to find that ? Put the driver on the same page as the software, it will help everyone.

Good, now, software can talk to the printer but you need , each time, to select your printer from the list of....one printer. It's cool to be able to connect more than one printer but if only one is connected, please use it.

Heating the extruder is fast compared to the bed who took about 15 minutes to reach 100C. It's not a big deal since it's working ! 

One big probleme now is that the extruder cable go on the way, blocking the X to reach the end-stop and sometimes block also the Y axis. Some users install a rubber or spring to retain the cable. On my side, I only keep the cable no the right side of the extruder before cloing the cover, this keep it from going at the wrong place.

Now, the worst part : 
When you try to manualy extrude plastic, a knocking sound come from the extruder and the filament is not extruded consistently.

I turn extruder temp up to 230C and now bumping sound stops. Cool ! Now it should be good !


NO ! :-(
Nothing stick to the plate...
I did the z-offset calibration and even that is not working. Try with AirSpray, blue tape and glue stick. Cleaned every time with Acetone but nothing.
With the bed at 100C and the extruder at 230C + 2x glue stick on the plate I can have a part of something.
But again sometime I have the bumping sound from the extruder. Remember me some past fail with my CupCake when the motor do not have enough power.

So, enough for now.
Next steps :
- Try to level the bed corectly.
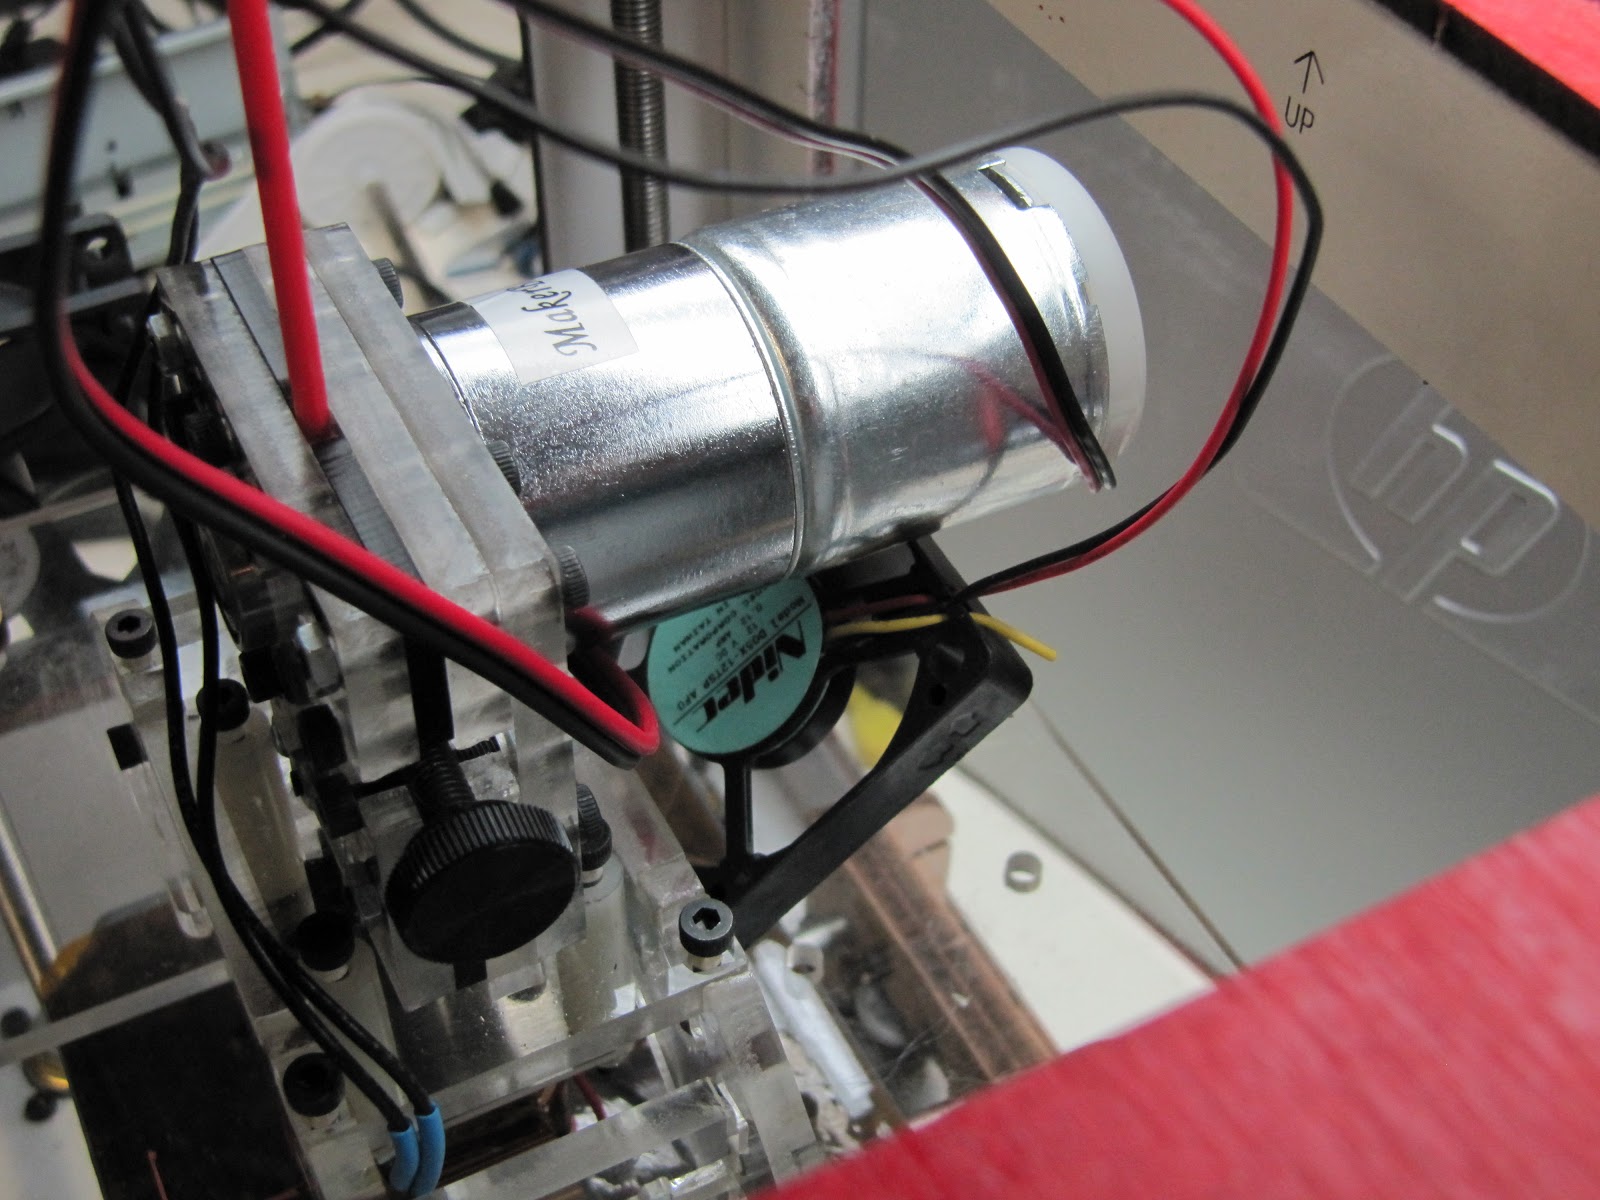
- Adjust the trimpot
- Contact Solidoodle
- Print with kapton tape on the bed

Wednesday, April 10, 2013

Robosapien V1

Robosapien V1

This is my new project !
I found this robot for 15$ but for that price I don't have the IR remote to control it.

I want to be able to put a new 'brain' inside and add some new functions.

I had in mind to use my EZ-Robot controller (they already have script for that) but because my Kid want to be able to play without the needs of a computer I will try to do something based on Arduino Controller.

So, I connected the wires to be able to inject command directly in the built-in controller.
Connections
Test with Ez-Robot controller
Connector for the Controller

This is the IR Codes : http://www.aibohack.com/robosap/ir_codes.htm
Code Exemple : http://playground.arduino.cc/Main/RoboSapienIR

Next step : Add a way to interact with the Robot to make it doing what we want ( voice control ??)

Monday, July 4, 2011

Arduino : Sleep_Fade Project part 2

I tested my project with the Kids and changed some things.

  • Removed : TIP120
  • Removed : LED Ring
  • Added : 4 Super bright LED
  • Added : A USB connector

To reduce size and cost, I removed the LED Ring and use 4 LED instead. Since this doesn't need too much power I removed the TIP120.
I added a USB connector so they can charge a MP3 player on it.

How it works:

  • Red button activate the reading time and the LEDs
  • After 15 minutes the LEDs blink and the buzzer alert that it's time to stop reading
  • The 4 LEDs slowly fade until Off (set to 90 minutes)
  • The blue button reset the Fade Off to 90 minutes.


Next steps :

  • Modification to the USB connector to help charging devices (some need the data line)
  • Code modification
  • Maybe a reset switch or I will use the 2 buttons at the same time.....


Code:
/*
TimedFader
Will wait for X minutes before fading the Output

Nicolas Gravel
nicgravel@gmail.com

V. 1.0.2
July 3rd, 2011
*/

// constants won't change. They're used here to 
// Use only ATtiny85 or Arduino pins initialisation

// set pin numbers: ATtiny85
const int MainLED =  0;      // Main LED + TIP120 for External light
const int Buzzer = 1;        // Piezo
const int Button1 = 2;       // Main button Start the waiting time before Fading Time
const int StatusLED = 3;     // Heartbeat LED
const int Button2 = 4;       // Start or Reset the Fading Timer.

// Set pin number : Arduino
/*
const int MainLED =  11;     // Main LED + TIP120 for External light
const int Buzzer = 12;       // Piezo
const int Button1 = 7;       // Main button Start the waiting time before Fading Time
const int StatusLED = 13;    // Heartbeat LED
const int Button2 = 8;       // Start or Reset the Fading Timer.
*/
// 5minutes=300, 15 minutes=900, 60 minutes=3600, 90minutes=5400, 120minutes=7200
// variables will change:

int TimeToWait = 900;        // -> How many seconds before the FadeOut will start <- Can be adjust
int TimeFade = 5400;         // -> On how many seconds the FadeOut will be        <- Can be adjust

int TimeWait = -5;           // Waiting Timer
int TimeFadeLeft = 0;        // Time Left in the FadeOut process
int Interval = 5000;         // HeartBeat delay
long PreviousMillis = 0;     // will store last time we enter the Loop ( each second)          
int Ledstate = LOW;          // Used for the Hartbeat LED. This help for blink from Mostly ON or OFF

void setup() {
  // initialize the OUTPUT pin:
  pinMode(MainLED, OUTPUT);      
  pinMode(StatusLED,OUTPUT);
  pinMode(Buzzer,OUTPUT);
  // initialize the pushbutton pin as an input:
  pinMode(Button1, INPUT);
  pinMode(Button2,INPUT);
 //Serial.begin(9600);
}


void loop(){

  // read the state of the pushbutton value:
  if(digitalRead(Button2)==LOW) //I have a NC button instead of a NO
  { // Button2 will only reset FadceOut Timer
    TimeWait = -2;
    StartFadeOut();
  }

  if(digitalRead(Button1)==HIGH)
  { //Button1 Start Waiting Time before FadeOut Timer
    TimeWait = TimeToWait;
    digitalWrite(Buzzer,HIGH);
    StartFadeOut();
  }
  else
  { // Turn Buzzer Off
    digitalWrite(Buzzer,LOW);
  }  

  unsigned long currentMillis = millis();
  if(currentMillis - PreviousMillis > Interval)
  {
    PreviousMillis = currentMillis;   
    //Serial.println(TimeWait);
    if(Ledstate==LOW)
    { // Blink Status LED. StatusLED will be mostly ON When in Waiting time
      // or mostly off when Fading or when done.
      digitalWrite(StatusLED,HIGH);
      delay(50);
      digitalWrite(StatusLED,LOW);
    }
    else
    {
      digitalWrite(StatusLED,LOW);
      delay(50);
      digitalWrite(StatusLED,HIGH);
    }
    
    if(TimeWait == 0)
    {
      // Mostly Done waiting. Turn StatusLED Off
      Ledstate=(LOW);
      digitalWrite(StatusLED,LOW);
      TimeWait--;
    }
    else if(TimeWait > 0)
    {
      //Waiting ....
      TimeWait--;
    }
    
    else if(TimeWait == -1)
    {
      //Done Waiting. 
      TimeWait--;
      MainFlash();
    }
    else if (TimeWait == -5)
    {
      //Startup State do nothing please
    }
    else
    {
     //Fading OUT Started
     Ledstate=LOW;
     if(TimeFadeLeft > -1)
     {
       int x;
       x = map(TimeFadeLeft, 0, TimeFade, 0, 255); //Map the LED value (0-255) to the TimeFade (0-xx)
       //Serial.print("Fade X now is : ");
       //Serial.println(x);
       //Serial.print("Fade Left is : ");
       //Serial.println(TimeFadeLeft);
       analogWrite(MainLED,x);
       TimeFadeLeft--;
      }
      else
      {
        //All done ! StatusLED blink only every 5 sec.
        Interval=5000;
      }
    }
  }   
}


void StartFadeOut()
{
  //FadeOut initialization
  Ledstate = HIGH;
  TimeFadeLeft=TimeFade;
  analogWrite(MainLED,255);
  digitalWrite(StatusLED,HIGH);
  Interval = 1000;
}

void MainFlash()
{
  // Flash MainLED and Buzzer 3 Times.
  for (int i=0; i <= 2; i++)
  {
    analogWrite(MainLED, 0);   // set the LED OFF
    digitalWrite(Buzzer,HIGH);
    delay(100);              // wait 
    analogWrite(MainLED, 255);    // set the LED ON
    digitalWrite(Buzzer,LOW);
    delay(100);
  }
}


Sunday, July 3, 2011

Arduino : Sleep_Fade Project

My Problem :
My kids always read in the bed before sleep time. We gave them like 15 minutes with a flashlight and they like that. But now, we have a major problem : the Flashlight have a good effect on the fatigue but a bad one on the Eyes. Optometrist told us to stop that and let them read with a bigger light. Now the problem is that kids doesn't want to sleep after the Reading delay because of the Bigger light so they don't always stop at the correct time. Another problem, they have a Lava Lamp as a night light. This is a very beautiful light but much too bright to help them falling asleep.

My Solution :
A small Night Light with a built In Timer that will alert when it's time to close the Room light and with a Night Light that will fade slowly until turning off.  With that , Kids will know when to Sleep and should slowly fall asleep. No more fear about the dark when the light turn Off.

BOM :
Next steps:

  • Need a case
  • Test with Kids ;-)


Prototype

First real board


Thursday, June 9, 2011

Arduino : My first mini Shield

I'm currently working on a small Arduino project (future Post) and I want to put all that on a ATtiny85 Microcontroller (smaller, cheaper).
I found a tutorial about how to program the ATtiny85 from the Arduino board and that works really well.
I only had to add a resistor on the Arduino Reset pin as noted on that Blog.

Because I need my Arduino Board and I don't want to have to connect all wires every time I want to program my tiny85, I made a Shield. So now, I only need to put my tiny85 on the Shield and the Shield on the Arduino.

Ok, it's not so beautiful but it works well :-)

Monday, May 9, 2011

Prusa HBP and Hot End

I received my Heated Bed from Ultimachine and I need to have a solid base to put it on. I already had a board of wood but I'm sure it's not a good idea to put a Heated Bed that can go up to 110C on top of that. So I choose to make one in ceramic. I found one at the Home Depot for only 2$ and I cut it to the correct size. Harder part was to make the holes. Now I will install the HBP on top of that  maybe with magnets, i'm not sure yet. Other way will be to drill 4 other holes but it was such a pain to make the first 4, i don't think i want to go that way again ;-) .
Drilling holes in ceramic plate
Ceramic plate mounted in place
HBP / Wood / ceramic

I also printed my extruder as the one from GregFrost on Thingiverse. I added a lever from Jag  for easy filament replacement. I build the HotEnd that I received from Techzone and now I need to install it on the Extruder. I need to find a way to make sure it will stay there and support the pressure. I hope to not have too much problem with that extruder ....bad memories from the MK4 .....

Extruder
Techzone Hot End

Wednesday, May 4, 2011

My Prusa start to look like a Prusa ;-)

So many things since the last post :-)
I recveived my belt from Ultimachine (I didn't find anything local) but I needed to remove the Gear from motors. I wasn't able to remove that be hand or with my mouth ;-).
I't now time to use the Dremel !
Was not an easy job. I also had to make a flat surface on the shaft for the screw to hold the gear.


X Y and Z motors now in place and working. I also place the Techzone board in my case. At the end I will put the cover to protect the board from anything that can go there. Almost all cables are well placed.

EndStop connected but some are not fixed well for now. I need to check for the Y axis , I don't have any thing to trigger the sensor right now.

Next, I need to :
- Wait for my heated bed from Ultimachine
- Wait for my 8" X 8" Kapton film from Makergear
- Try to like Repsnapper. I really don't feel that software. Maybe it's because i'm with ReplicatorG for so long....
- Find a way to change the Z settings to make it moving for 1mm instead of the like 10mm for now.
- Print and install the extruder from GregFrost

If someone have any idea on how to make the Monotronic board working in ReplicatorG, let me know please !!!

Tuesday, April 5, 2011

Prusa : on it's way !

Yes !
I received my motors. I found them on eBay for about 55$ with the shipping for 8 of them. Good deal.
So, I started to work a little more on my Prusa. The Z stage is done but need some adjustment. I think I will look to find another coupler. I don't like the one from the Prusa Plate.
I now need to find Belts,  I didn't find anything locally. I was thinking to use some from old printer but after dismantling many printers nothing can be use for that.
Next steps : Z stage adjustment, X carriage, and extruder.


Sunday, March 27, 2011

Just received the electronics for my Prusa

I just received my new Monolithic electronics from Techzonecom for my Prusa.
Looks great and very small when compared with the Gen 3 on my Cupcake.
TechZone also sent me a Extruder Tip for free because they lost my order and it took longer than expected to revive it. This is something that show you when a company want to satisfy clients and not only take there money.
I also order a Thermocouple addon in case i want to add a HBP.
Strange things is that the two converter are not the same. One look to have a MOSFET and not the other. Will  ask them but I think one can only show temperature and can't control the heating....
I also only receive one Thermocouple wire. Maybe I had to order one by myself, anyway that only cost 1$.
Now, i'm waiting for the motors from eBay.


Friday, March 11, 2011

Choisir son imprimante 3D

This post, in French, is to help on 3D printer selection. Nothing scientific, only my opinion.


Plusieurs personnes me demandent de l’information sur les imprimantes 3D. Voici donc un petit résumé sur les possibilités d’achats. Il y a surement beaucoup d’autre options, surtout que le monde de l’impression 3D change très rapidement. Ceci est basé sur mes connaissances.


Pour commencer il y a les modèles à poudre.
Le procédé à poudre est vraiment bien mais Extrêmement couteux. Environ 15k$ pour partir et le matériel (cartouche) coute assez cher.
Le produit qui en sort est très fragile et demande un traitement pour le nettoyer et le solidifier.
C’est un produit professionnel, pas vraiment pour s’amuser.

Le procédé Fused Deposition Modeling (FDM) quant a lui ne demande pas de finition (ou presque).
Avant de vous lancer dans l’achat, vous devez vous poser certaine questions :
1-   Est-ce que je veux un appareil prêt à l’emploi ou bien je veux avoir la chance de le construire moi-même ?
2-   Quel est mon budget ? Est-ce que mon but est de payer le moins cher possible ?
3-   Est-ce que j’ai un besoin spécifique pour la grosseur des objets à imprimer ?

Répondre à ces questions va vous aider grandement dans le choix de votre imprimante.

Modèles prêt à l’emploi
Ces imprimantes sont beaucoup plus cher que les autres mais offre généralement un support de la compagnie. Vous devez choisir un de ces modèles si votre but est de déballer l’appareil et d’imprimer dans l’heure qui suit.

Un très beau model avec la plus grande surface pour l’impression (275 x 275 x 210mm).
Peu imprimer directement d’une carte SD sans avoir besoin d’un ordinateur.

Plus petit que le précédent (140 x 140 x 135mm) comprenant son propre logiciel.
Il utilise un filament ABS de 1.75mm ce qui était un problème au début car il était le seul à utiliser cette grosseur. Maintenant plusieurs endroit offre ce produit.
Le désavantage de cette imprimante est la quasi impossibilité de le modifier et Il utilise un logiciel propriétaire.

Le moins cher directement basé sur les Mendel (http://reprap.org/wiki/Mendel). Plateforme de 200 x200 x 140mm.
Solution entièrement modifiable, fait à partir de pièces provenant d’une imprimante 3D.

Kits
Les kits demandent pas mal de temps avant de pouvoir imprimer pour la première fois. Il faut compter un bon 8 heures et beaucoup plus pour calibrer l’appareil correctement. Par contre, les nouveaux produits sont de plus en plus précis et fiable.

C’est pas mal les premiers à avoir offert un Kit complet pas cher. (Le CupCake coutait 650$) L'avantage de faire affaire avec eux: Support technique, possibilité de faire remplacer des pièces si défectueuses et bien documenté. 
Par contre c’est la surface d'impression la plus petite. (96 x 108 x 100(?) mm).

L’avantage de ce kit est la disponibilité pour le Canada puisque depuis peu, il est disponible via RobotShop.ca. On élimine donc les frais de douane (qui peuvent êtres très élevés). Les spécifications sont très semblables au Glider 3.0.

Kit complet du même genre que le Glider 2.1. Makergear est reconnu pour ses composantes de qualitées.


En dernier lieu, il y a la possibilité de tout faire vous-même.
Je ne conseil pas ca pour la première fois car c’est assez exigeant de trouver toutes les pièces nécessaires. Le mieux est de commencer par un Kit et d’apprendre à le configurer comme il le faut.


Dans votre choix, veuillez ne pas oublier les couts de livraison et de dédouanage si acheté en dehors de votre pays

Bon magasinage !
.

Monday, March 7, 2011

PLA - Not a easy thing

I receive my first little spool of PLA from Ultimachine. Wow ! They also sent me 2 samples of PLA in Black and Green. Thanks Guys ! I will use them to try to  print for the first time with PLA.

First : As I wanted to remove my ABS from my MK5, I heated it to 210. I removed the ABS and Set to 180 for the first test. I think this was a little to hot . The PLA was too soft even in the Tube that go to the head. Result : the PLA cannot be push without deformation. I even had problem to remove it from the MK5 :-(
I turn it off to cool it down for 15 minutes to be sure all parts are cooler. Now I set that to 150C and I can push PLA by hand to the extruder. Test extrusion also works well at that temperature.

Second : The HBP (Hot Build Platform) need some changes. PLA doesn't look to stick well on Kapton. I tested with some blue tape and it look to stick BUT not so much.... I think I have temperature problem. Don't know if it's on the HBP (set at 50C) or the Extrusion (150C) but each layer doesn't look to stick well on the previous one. Now I think to try with Glass but that mean some modification to my plate.
I'm currently using an HBP V1 from Makergear, so I don't have any bolt on top (this is cool when printing) to screw other thing on top.
I will try to add a metal layer between my HBP and the Glass to help heat exchange. I think I will just test by taping the Glass to the plate.

So, a slow start but at least the basics work. Now I need to make it working as if it was ABS.
My first goal is to print Prusa Bushing in PLA.

Side note : PLA Smell good ;-)

Thursday, February 24, 2011

My try with Prusa

It's now time to use my Cupcake to what is should do : Printing a printer.
I decided to make the SAE version from spacexula because i have many problem to find Metric hardware here in Quebec City, Canada.
So I paid about 18$ for all rods. Not too bad.
I have almost all parts printed but waiting for my bearing. I found 10 for 1$ + 7$ for shipping on eBay. Hope they will not take too long.
I also found some stepper motors on eBay but don't know if they are good for that project. I need to search.
I also need to decide on the electronics I will buy and the extruder.
I know that Gen4 from Makerbot have place for more things and I like that. I don't want to buy something that will limit me or that need to be change in a month.
I need something that can handle : XYZ stepper motors, Extruder Stepper motor, HBP, FAN, LCD and why not a second extruder since MBI released a water soluble PVA .
I don't know if the RAMPS can handle all that....
Anyway, I have some time to think about that, MBI Gen4 and RAMPS from Ultimachine are out of stock.

Maybe I will continue to print Prusa pieces and sell them to future Canadian builder...

Thursday, February 17, 2011

My Thing in ReplicatorG 024

I'm really happy today.
I just found that my filament Dust Remover for MK5 on Thingiverse is now part of the ReplicatorG 024 software.
YES !! They added some examples and my thing is in the section : "Examples \ Upgrades \ Makerbot".

Monday, February 7, 2011

Makerbot #453 : Why do we need a Dust Remover.....

I'm really happy that many people like my Filament Dust Remover.
If some of you don't care about having one, this picture may help you to choose to have one....

Friday, February 4, 2011

Makerbot #453 : Finally, my first big print

Oh yea !
Now it's real, I was able to make the first plate of a Prusa. Little warp found but for a start it's good.
I really need something to hold my filament so it will feed the extruder without intervention.
It took 5h30 to print that plate. Don't know if it's normal....Anyway, it print :-)

Sunday, January 30, 2011

Makerbot #453 : My HBP wanted more juice

I had some problem with my HBP. It look like it was because the power had some problem reaching is target...
In fact, I have a HBP from Makergear and it's cool it can be remove but that can also, in some case (like now), result on some bad connection.
So now, I connected the power directly to the HBP, no more from the screws.
With that, Now I can reach my target faster and it keep it .
Wireless can be good, but never as fast as a Wire ;-)

Monday, January 17, 2011

Makerbot #453 : is it my MK5 Motor that killed my Extruder board ??

Happy new year all !
I decided to start 2011 well by trying to make my CupCake working.
I had many problems with the new MK5 and wasn't able to make a single good print.
Now I know why the motor was stopping....because it was defect.
The motor look to be the problem. I installed the old one from my MK4 and it print Well.
To be sure, I tested again witht the MK5 and.... BANG !! The MOSFET explode...
Bouhouhou ! So sad...
Anyway. By chance we have now the possibility to switch to the second MOSFET in ReplicatorG.
Now, with my first motor, i'm printing and all works !
One thing I noticed : With the MK5 extruder, the heat going to the motor look to be higher than with the MK4.
If you add the HBP you have a pretty amount of heat going to your motor.
So, I decided to add a small Fan to help with the heat dissipation.
I connected the Fan to the same power source as the Motor to reduce the number of cable going there.

Sunday, October 31, 2010

Makerbot #453 : MK5 motor problem...

I'm trying to use my MK5 and need to calibrate Skeinforge. But how can I do that if the motor always stop in the middle of the print and restart by itself ? That append many times in the print. Doesn't look to be the board since the LED turn on when it should. It's a new motor with the little electronic board inside. I think I will try with my old motor from MK4 (one without the board inside) to be sure if it's the motor or something else...
Maybe I will have a week of printing without any issues...... someday...

Friday, October 22, 2010

Makerbot #453 : Homing in place

Last night I took some time to make my Start and End script for Skeinforge so I will not have to recenter my plastruder each time.
First, I was using G0 X100 Y100  to push the build plate at the end but I found that it took some time after reaching the endstop before doing the next steps. It took Much much longer time also with the G0 Z-50. It took about 2 minutes before doing next commands.
I found that G28 works better. No waiting time when reaching the endstop. I had to make some modification to my Z endstop triggers. I know it's not looking really good but it works. Next time I will make one in ABS with the possibility to adjust it.


(beginning of start.txt)
M104 S220 T0 (Extruder Temperature to 220 Celsius)
M109 S100 T0 (Heated Platform Temperature to 110 Celsius)
M107 (fan off)
G21 (Metric FTW)
G90 (Absolute Positioning)
G92 X0 Y0 Z0 (You are now at 0,0,0)
G0 Z5 ( Go higher to be safe)
G28 X0 Y0 ;go home ( XY at the MAX)
G28 Z0 ( Go down with Z)
G92 X0 Y0 Z0 (You are now at 0,0,0)
G0 Z1.5 (Higher a little bit to clear the place)
M6 T0 (Wait for tool to heat up)
G0 X57.5 Y45 (Put the build plate in the center)
G0 Z-1.5 (return to the base)
G92 X0 Y0 Z0 (You are now at 0,0,0)
(end of start.txt)

(beginning of end.txt)
(end of the file, cooldown routines)
M104 S0 T0 (temp zero)
M109 S0 T0 (platform off)
M106 (fan on)
G21
G92 Z0 (zero our z axis - hack b/c skeinforge mangles gcodes in end.txt)
G91
G0 X100 Y100 Z20 (
M18 (turn off steppers.)
G04 P120000
M107 (fan off)
(end of end.txt)


Makerbot #453 : MK5 working !!

My bot is now working with my MK5 installed. Doesn't took me too much time to build and it works right on the first time. OK, some adjustments need to be done but i was able to print a 15MM cube and a whistle :-)

I also updated firmwares with latest one from ReplicatorG 20 and for the first time I was able to print raftless without any adjustment. It was not perfect but far better than before.


Monday, October 18, 2010

Makerbot #453 : MK5 on my desk !

YES !! Just received my MK5 kit. Should start to look at that tonight. Hope to make my Bot working soon, before the 1 year anniversary ;-)
This will be a big test compare to my last use : New Plastruder, New ReplicatorG, New Skeinforge.
If all go well , I plan to buy the ABP. I wanted to take it at the same time of buying my MK5 to save on shipping but I need to be sure I will be able to print correctly before any other big ($$)  addition to my Bot.

Wednesday, October 6, 2010

Makerbot #453 : Waiting for my Plastruder MK5

It's so hard to calibrate everything on the cupcake :-(
I don't have enough time in my life to spend on calibration. I so hope for a process to calibrate the machine. Meanwhile, I will try with the new MK5 from Makerbot . I hope This will help me to start printing more then just some little pieces of crap. By the time the MK5 come home, I will try to set my machine to find is 0,0,0 before each print.
.

Wednesday, August 11, 2010

Makerbot #453 : I broke my Acrylic Insulator Retainer

Last week-end I was trying the new Replicator G v18. I printed the Z cover from

MakerBot Board Covers by WRIGHT1 . Not a bad print but some noise from my Plastruder, just something like "crack". Cover Z is good so I started to print the Y cover. Unfortunately, the Retainer was binding making the head touch the print. That was the end of the retainer. By chance, I have a copy of the retainer in ABS (hope it is good). 

It's now time to build and install my  MakerGear HeatCore. I will also try to find a way to dissipate more heat from the insulator, that will help the retainer.


Tuesday, August 10, 2010

Makerbot #453 : RepG 18 And Temperature.

I was trying the Rep G v18 and wanted to make some adjustment. I changed the thermistor table values to make some test but I didn't took note of originals values ( This is what append when you work in the night).
Now I have strange behavior : When I set the Temp to 200C, the reported temperature stop at 190C (always 5 to 10C under what it is set). That make impossible to print since the script wait for the correct setting.  The only way t o make it working is to set the temp. to 10C more than required. This give me enough time to start the print before temp go down under required setting.
I will try to find originals values and will do more tests.

Thursday, July 22, 2010

Makerbot #453 : What should be done to help us is...

Since the beginning, I had many problems with my printer. It's ok, I like to debug and correct problems.
What I think is harder is to make the calibration. If only I had more time to read all possible settings of Skeinforge and try all of them to know exactly what they do... But it's not the case.
Why not having a couple of test pattern related to some important settings to help us doing it right ?
Like with a inkjet printer where you print a sheet and you need to tell the printer which line is the best one.
For the 3D printer maybe a couple of simple print with a small guide that tell you if you need to change a couple of values in skeinforge. " If  part #2 look like this, put a smaller value for setting X".
Yes that will took Us to print many time the same test pattern to have a fully calibrated printer, but it will help to not loose our head in all the settings.

Also, when the printer is calibrated, why not having in RepG a pop Up asking what type of printing we want ?
Again, like with a inkjet printer.
- Draft, Medium, High Quality,
- Infill Full or just a little...

Ok, maybe i'm dreaming....
WAIT ! A couple of years ago, i was dreaming of printing ABS :-)

Tuesday, July 20, 2010

Makerbot #453 : Hard to print Small parts

I have so many problem when i'm trying to print small parts. :-(
I had to print a square of 12 X 17 X 2 mm with a design cuts inside. That make a 2 mm between the side and the hole. Gush, it was not a big success. I printed something better with a 1.5X bigger version.
Need to put time on Calibration :-(

Sunday, May 2, 2010

Makerbot #453 : Ceramic Heated Build Platform (HBP) part #2

To connect the thermistor, I bought a temperature sensor. 

I found 2 problemes with it.
First : the connector are not correct for the A6 connector on the plastruder. The VCC and the 5V.  need to be switch. After cutting the trace I placed a small wire to make it right.


Second problem : The green connector on the Temperature sensor board is too big and crash on the casing when going UP. So I decided to not connect it directly on the plastruder board. Because of that, the bad wiring are no more a problem since I'm using a wire. With the wires I can connect it where I want. Anyway, the switch is already done.... Note to me : Next time, look if a new part can be place safely where you need it.

To drive the HBP I'm using a Relay. I installed a LED (took from a old Network touter )  to see when it's heating or not. 


The relay is placed with the sensor board on the right side of the Makerbot.


This is the connection on the plastruder :


The test show that it's now easy to reach 100C in less than 10 minutes.


Now, I need to find a good cable to connect all of that to the HBP. I need something long enough and also a cable that can move with the HBP.

Wednesday, April 28, 2010

Makerbot #453 : Back on track !

After weeks without using my printer, i'm back !
I started to print a mini-mendel ( Mini-Mendel Production Files by cyrozap) and it look good. I only printed the first sheet for now. It took about 80 minutes. I only have a small curve because the acrylic bent a little bit. I will post picture tonight...
My next step is to build my Heated bed. I will test it with the next Mendel parts.
I Also have to correct 2 littles problem on my bot : Z rods wobbling and X-Y vibrations.
I will take care of the vibration when modifying the build plate.